Post by iSamoora- Maghraby ❤ on Aug 27, 2006 14:50:31 GMT -5
This tutorial is made by Lymie.
Want to know how people make those cool glitter text? This simple tutorial will help you using Adobe Photoshop and Image Ready.
1. First open a new document on Photoshop. Make sure that the background is transparent.
2. Use the type tool and type whatever you want.

3. Next, go to Filter>> Noise >>Add Noise. A small window will prompt you. Just press Ok. (It means that you will rasterize the text layer and the text you typed can no longer be edited)
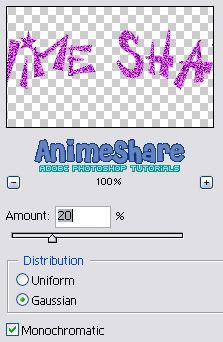
4. Then, on the Add Noise window, input the amount of noise that will satisfy you. Be sure to check the Monochromatic Box. And of course, if you don't check the monochromatic box, some colors that is really not "cool" to show on your text will show up. If you choose the gaussian, you will notice that the grain is more visible than uniform. I highly suggest that you should choose the gaussian. Once satisfied on the amount of noise and noise distribution, press OK.
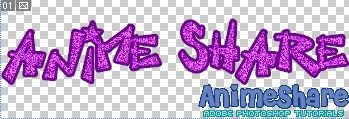
5. Duplicate the layer we applied the noise on. Then, on that duplicated layer, press CTRL+F to repeat the application of noise we just did. You can press it once, or twice. it depends on what you like. In my case, I pressed CTRL+F twice.
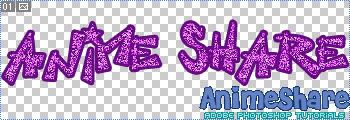
6. Now then, duplicate the second layer and press CTRL+F twice or thrice. And again, it depends on what you like.

7. Finally, we're ready to animate that simple text. Go to File>>Jump To...>>Adobe Image Ready or simply press CTRL+SHIFT+M.
8. On Adobe Image Ready, go to Window>>Animation to show the animation window. Create a new frame by clicking on the small button (encircled in red). Since we have 3 layers on Photoshop, we must make 3 frames

9. Select the first frame. Then, on the layers window, you can see the "small eye" (encircled in red) beside each layer. Click the "small eye" of the second and third layer. And as you can see, on our first frame, you can see that Layer 1 (on photoshop) is present on the first frame. Basically, what that "small eye" does is to make a certain layer invisible/visible.

10. Next, select the second frame. Do the same thing. But this time, making the second layer visible and making the first and third layer invisible. You can do that by clicking the "small eye" area again.
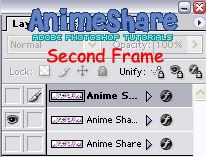
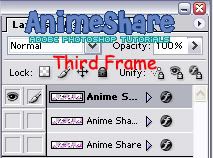
11. Now then, select the final layer and do the same thing. And this time, making the first and second layer invisible.
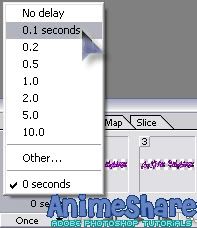
12. Next, select the first layer and you can see the "0 sec." thing. Click on that and select 0.1 sec. Do the same thing on the other frames. 0.1 seconds is the time interval of each frame
13. And then on the looping options, select forever to make your text glitter forever. Or should I say unstoppable .
.
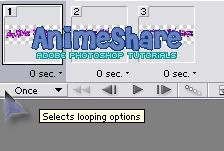
14. Click on the play button to see your text glitter!!
15. To save it, press CTRL+ALT+S or CTRL+ALT+SHIFT+S. And to preview it, press CTRL+ALT+P. Remeber to save it in .gif format.
16. And there you have it. A glitter text of yours!! Very easy right?

Enjoy
p.s: I didn't make it, I got it from a site!! ;D
Want to know how people make those cool glitter text? This simple tutorial will help you using Adobe Photoshop and Image Ready.
1. First open a new document on Photoshop. Make sure that the background is transparent.
2. Use the type tool and type whatever you want.

3. Next, go to Filter>> Noise >>Add Noise. A small window will prompt you. Just press Ok. (It means that you will rasterize the text layer and the text you typed can no longer be edited)
4. Then, on the Add Noise window, input the amount of noise that will satisfy you. Be sure to check the Monochromatic Box. And of course, if you don't check the monochromatic box, some colors that is really not "cool" to show on your text will show up. If you choose the gaussian, you will notice that the grain is more visible than uniform. I highly suggest that you should choose the gaussian. Once satisfied on the amount of noise and noise distribution, press OK.


5. Duplicate the layer we applied the noise on. Then, on that duplicated layer, press CTRL+F to repeat the application of noise we just did. You can press it once, or twice. it depends on what you like. In my case, I pressed CTRL+F twice.

6. Now then, duplicate the second layer and press CTRL+F twice or thrice. And again, it depends on what you like.

7. Finally, we're ready to animate that simple text. Go to File>>Jump To...>>Adobe Image Ready or simply press CTRL+SHIFT+M.
8. On Adobe Image Ready, go to Window>>Animation to show the animation window. Create a new frame by clicking on the small button (encircled in red). Since we have 3 layers on Photoshop, we must make 3 frames

9. Select the first frame. Then, on the layers window, you can see the "small eye" (encircled in red) beside each layer. Click the "small eye" of the second and third layer. And as you can see, on our first frame, you can see that Layer 1 (on photoshop) is present on the first frame. Basically, what that "small eye" does is to make a certain layer invisible/visible.

10. Next, select the second frame. Do the same thing. But this time, making the second layer visible and making the first and third layer invisible. You can do that by clicking the "small eye" area again.

11. Now then, select the final layer and do the same thing. And this time, making the first and second layer invisible.

12. Next, select the first layer and you can see the "0 sec." thing. Click on that and select 0.1 sec. Do the same thing on the other frames. 0.1 seconds is the time interval of each frame

13. And then on the looping options, select forever to make your text glitter forever. Or should I say unstoppable
 .
.
14. Click on the play button to see your text glitter!!
15. To save it, press CTRL+ALT+S or CTRL+ALT+SHIFT+S. And to preview it, press CTRL+ALT+P. Remeber to save it in .gif format.
16. And there you have it. A glitter text of yours!! Very easy right?

Enjoy

p.s: I didn't make it, I got it from a site!! ;D


 lol..... hey do u know somewhere i can download it online?? ;D........ OMG I'M SO EXCITED to try all these stepsss!!!